Monday, December 5, 2011

Cool Game Room Shots

I was able finish the wiring on the MultiWilliams control panel and move most of the games in this weekend. Here are a few pics!

Thursday, December 1, 2011

Game Room Floor finished!

To continue my post from October on my game room floor, I thought I'd add a few pics of what the floor looks like COMPLETELY finished with the quarter round installed, area rug and the beginning of bringing some games in!

Thursday, November 17, 2011

Custom Heavy Barrel Overlay Installed!

I finally got the custom Heavy Barrel control panel overlay printed and installed. It was a bit tricky since it was on a Dynamo cut-corner panel, but it turned out really nice!

Thursday, October 20, 2011

MultiWilliams is 95% Complete!

The horrible looking, converted Joust cabinet that I picked up eons ago, is now not so horrible looking anymore! With all the cosmetics finished up, this looks like a completely different cabinet! Here are the Befor and After shots:


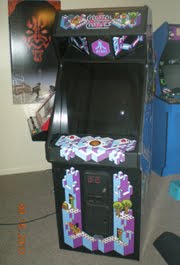
All that I need to do is finish up the DC wiring, re-install the monitor chassis and cut a new top back door. I can't wait to play some Joust!

Tuesday, October 18, 2011

Staining My Concrete Game Room Floor

A few weeks ago, we had a small plumbing problem in our downstairs basement/game room. Nothing too major- no damage to anything but the carpet. Luckily, the previous owners didn't cap the drain under the carpet and most of the water found its way down the drain. So, as I was looking into the best flooring options, I started to think down the road and all the "what if's" that could happen down there. Wifey and I both thought tile was the best solution (no more carpet!), until I read about staining concrete floors. So I gave it a go.

I looked all over the internet for the safest and best way to stain the concrete. Muratic acid yields the best effect, but it's really nasty stuff and I didn't want to take a chance with it indoors. So I opted for a water-based stain kit by Rust-Olem. According to most reviews, it's really durable and there are a few things you can do to further the durability.

Last weekend, I began cleaning the concrete. What a major pain in the a$$, unless you like mopping. Here's a pic of the floor before the cleaning/stripping:


You can see the paint, dirt, etc. from the previous owners. No big deal- a little Citristrip and it came off, no problem. I then patched the holes left by the tack strips from the carpet. One thing I was concerned with was that there almost seemed like there was a previous sealer applied. So I got out the rough stuff- Stypeeze and applied it to a small area that looked shiny. Nothing really changed, so I proceeded with the staining process.

The first step is to etch the concrete with the mild acid provided. It basically deep-cleaned the concrete with a lot of fizzing. Then rinse, rinse, rinse. The kit comes with 2 stains that can be mixed at the paint counter. I did a light and a dark to get a mottled effect. I put the light stain down everywhere and then after an hour, I put the dark stain down in areas. Once I was happy with it, I put 3 coats of the sealer on it. Here's where it stands:


I tried the invisible fluorescent paint, but it didn't work. It just peeled right off the floor. Oh well. I'm pretty happy with it. Last night I added 4 coats of top wax to add durability. I still need to paint the drain cover and add 1/4" round to the base boards around the room to give it a finished look.

Tuesday, September 13, 2011

MultiWilliams Stencils Are Finished!

I finished all colors on both sides of my MultiWilliams restore this past weekend. I love the way it came out. I added the control panel and the bezel just to get a sneak preview of what the finished product will look like:

I still have a lot of work ahead, but this is a huge step. I need to place an order for parts in order to move forward.

Thursday, September 8, 2011

MultiWilliams stencils almost finished...

I had a chance to begin on the stenciling for my MultiWilliams. I chose the Joust stencils for it since the cabinet was originally a Joust, but I wanted to do Joust 2 colors- black cabinet with orange, yellow and light blue stenciling. Using the plotter-cut stencils from Gamestencils.com, I put on two colors- orange and yellow:


I hope to get some time (and decent weather) this weekend to finish up the Joust rider in light blue.

Monday, August 29, 2011

More MultiWilliams work...

Well, I've not been able to get much done on my MultiWilliams project with the weather, my travel schedule and the kids' activities. But I did get a small window of time to put the final coat on the cabinet and finish the control panel this past weekend.

I picked up a re-production metal control panel from a KLOV member. I primed the control panel:

I then added the Phoenix Arcade overlay:

I headed over to Lowe's to pick up the paint for the Joust 2 stencils- Orange, Yellow and Sail Blue:


Hopefully, I'll get the stencils done next weekend... fingers crossed!

Wednesday, July 20, 2011

Championship Sprint added!

I worked out another trade with Darryl from Virginia a few weeks back. I picked up a converted Tron cabinet for him in exchange for a Championship Sprint project. This evening, he delivered it! The monitor is crisp and the game works, but the rest of the cabinet needs help. I already have a spare control panel, marquee and pedals for it, but that's not going to get it into game room shape. I'll search around for another Atari System II cabinet before I begin a restoration on it.

More MultiWilliams...

Got a bit further on my MW project. I rolled on some Rustoleum semi-gloss black oil-based paint to the sides, since I'm doing the Joust 2 coloration. I'll need to sand and apply one more coat, but it looks good already. I've got the stencils for the Joust art and will try my hand at stenciling soon...


I got to the coin doors done too in between visiting with the in-laws. They were in decent shape so just a bit of work with the wire wheel on my drill and then 2 coats of the hammered finish spay paint:

Thursday, June 9, 2011

Started work on my MultiWilliams

So I ignored my kids for 45 minutes :) and did some work on my Joust cab. I wish I remembered to take more pics, but alas, here's what I accomplished over the weekend.

I began sanding down the sides, all the swelled spots and bad edges and then applied bondo. The front corners were pretty mangled and I needed to do one more bondo treatment on this side after my second pic:

Next up, I'll sand and bondo the front and back then prime. Then time to sand the primer, re-prime and then hopefully top coat!

Tuesday, May 3, 2011

Gameroon Junkies posted about my Arcade FlyerMosaics

Preston of the Gameroom Junkies blog/podcast posted a nice piece about my Arcade FlyerMosaic Posters here.

Tuesday, April 19, 2011

Sold the Centipede

On Sunday evening, a couple of guys came to look at my Centipede project. They are young (in their early 20's) and it's really cool to see them interested in these old games. They have plans on restoring it to its former glory much sooner than I could. Now, it's time for me to get another game to replace it!

Friday, April 8, 2011

Nintendo Playchoice Added!

I posted a wanted thread on KLOV a few weeks ago looking for a Nintendo Playchoice 10 machine. It's a machine Nintendo released where you could insert a quarter that would buy an allotted amount of time to play up to 10 different games. These games were the NES games, but in a stand up arcade machine. I always thought they were really cool. Tonight, a local arcade collector delivered a Playchoice machine to me. In return, I trade him my Vs. cabinet. I am sad to see the vs. system go, but also very excited to have the Playchoice. He included 7 games: Dr. Mario, Super Mario Bros., Double Dribble, Rygar, Rush'n Attack, Trojan and Pro Wrestling. There are 3 open slots for additional games and I think I'll be adding Excitebike, Super Mario Bros. 2 and 3 to the mix.

Wednesday, March 16, 2011

A Few Pics in the Arcade

Here are a few pics from a family gathering that we had a few weeks ago. The kids had a blast in the "arcade."

Saturday, January 22, 2011

Bought a Pac-Man cabaret!

Well, it didn't take long for me to spend the money I made selling the Multicade. Within a week, I had one of my arcade collector friends delivering a Pac-Man Plus cabaret to my door. A "cabaret" is a mini version of the full size arcade game. This size is much better for the size of my small game room. I'll be looking for a Pac-Man to JAMMA adapter so I can add a 60 in 1 pcb to it.